 DoudouLinux
The computer they prefer!
DoudouLinux
The computer they prefer!
The site's languages [ar] [cs] [de] [en] [es] [fa] [fr] [it] [ms] [nl] [pt] [pt_br] [ro] [ru] [sr] [sr@latin] [th] [uk] [vi] [zh]

Screen settings
February 2011 — last update May 2013All the versions of this article: [čeština] [English] [français] [Bahasa Malaysia] [română] [русский]
DoudouLinux is featuring a tool to change the screen resolution and set which screen is on or off when 2 screens are plugged. Its interface varies depending on the number of connected screens. Usually on a desktop computer, there is only one connected screen and you will just be offered to set the screen resolution and refresh rate [1]. On a laptop you may want to have both the laptop screen and an external screen connected. In this case the interface is a little more complicated since you will be able to set each screen resolution and refresh rate independently, as well as which screen is active or not.
Case of a single screen
The tool to set the screen is located in the group “System” of the “Tune” tab. DoudouLinux is supposed to set a correct resolution at boot, this is why this tool is not directly placed in the “Tune” tab. The tool in case of a single video output is very simple:
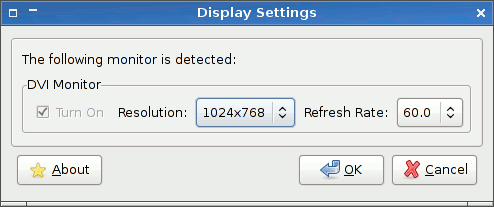
- Screen settings with a single display
Changes can be applied on the fly. The only drawback is that they are not saved when you leave the activity even with persistence activated, this is a known issue.
Note: there are no more screen resolution limits as there were in DoudouLinux 1.0 to 1.2 (Gondwana). We now have tweaked the advanced activities so that icons on the desktop grow in size with the screen resolution. This was the only purpose of these limits.
Case of two screens
If you start DoudouLinux with one screen plugged then plug the second one later, you will have to manually activate it with the screen settings tool, unless you close the current activity [2]. If you start DoudouLinux with two screens plugged, DoudouLinux should automatically detect them and set a resolution fitting well on the external one (supposing that you are using a laptop). The screens will show or try to show the same thing if their resolution cannot be identical. Especially, it may happen that the laptop screen only shows the top left part of the external screen.
Entering the activity “Whole DoudouLinux” you will be able to start the screen setting tool. This time the interface is a little more complicated. You are given the following options:
- switch on or off a screen, in the first tab
- set a different resolution on each screen, in the second tab
If you choose one screen only, the best resolution for that screen will be automatically chosen. If you choose both, as said above, the resolution is adapted to the external screen. If you have chosen the external screen only and want to unplug it, you may need to first reactivate the laptop screen if you do not want to end with no screen at all! Please note again that settings will not survive after activity exit, even with persistence activated.
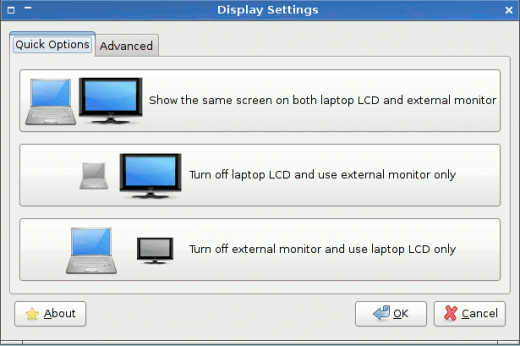
- Screen settings with 2 displays: which one is on/off
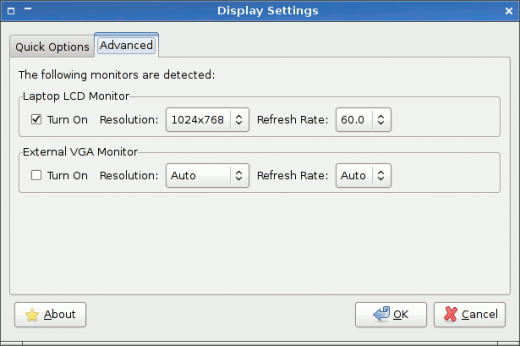
- Screen settings with 2 displays: screen parameters
Manual tuning
If you have Linux skills, you can change the screen configuration file named /etc/X11/xorg.conf in order to match your needs. This file is no longer existing by default because the system is performing a complete automatic detection at boot. You then need to create it first. Moreover changes in this file are saved only if you have activated full data persistence and the hardware signature feature that was available in DoudouLinux 1.0 to 1.2 is no longer available either. This was allowing to always use the same configuration file for a given computer, even if you are regularly using DoudouLinux on computers with different hardware configurations. Since DoudouLinux 2.0, any file /etc/X11/xorg.conf will apply to every screen and graphic card.
Changing the video driver
Sometimes the video driver is not correctly detected, especially on recent machines. In such case you can force the video driver in the configuration file /etc/X11/xorg.conf. You have to create this file with the following text:
Section "Device"
    Identifier      "Configured Video Device"
    Driver          "intel"
EndSection
Of course you need to know the name of the Linux driver you will use, here it is intel.
Footnotes
[1] The refresh rate determines how many times the screen is drawn per second. A rate too low leads to screen blinking, which in turn tires the eyes and may even cause troubles, such as head aches. To avoid this, it is recommended to set a refresh rate higher than 70Hz, which DoudouLinux does natively whenever possible.
[2] Screen detection and automatic setting is performed when the menu of activities is started.
Documentation
-
Applications
-
Configuration
- Mouse setting
- Sound settings
- Screen settings
- Keyboard layout
- Date/time and time zone
- The Activities Menu
- Using a USB key or a USB hard disk
- Using a printer
- Language setting
- Using networking
- Creating a WiFi hotspot
-
Questions and issues
-
Advanced tools
- Preserving user privacy
- Parental controls
- Controlling computer use
- Data persistence
- Creating a DoudouLinux USB key
- Installing DoudouLinux definitively


![]()
![]()
![]()
![]()
![]()
![]()
![]()
![]()
 Copyright © DoudouLinux.org team - All texts from this site are published under the license
Creative Commons BY-SA
Copyright © DoudouLinux.org team - All texts from this site are published under the license
Creative Commons BY-SA